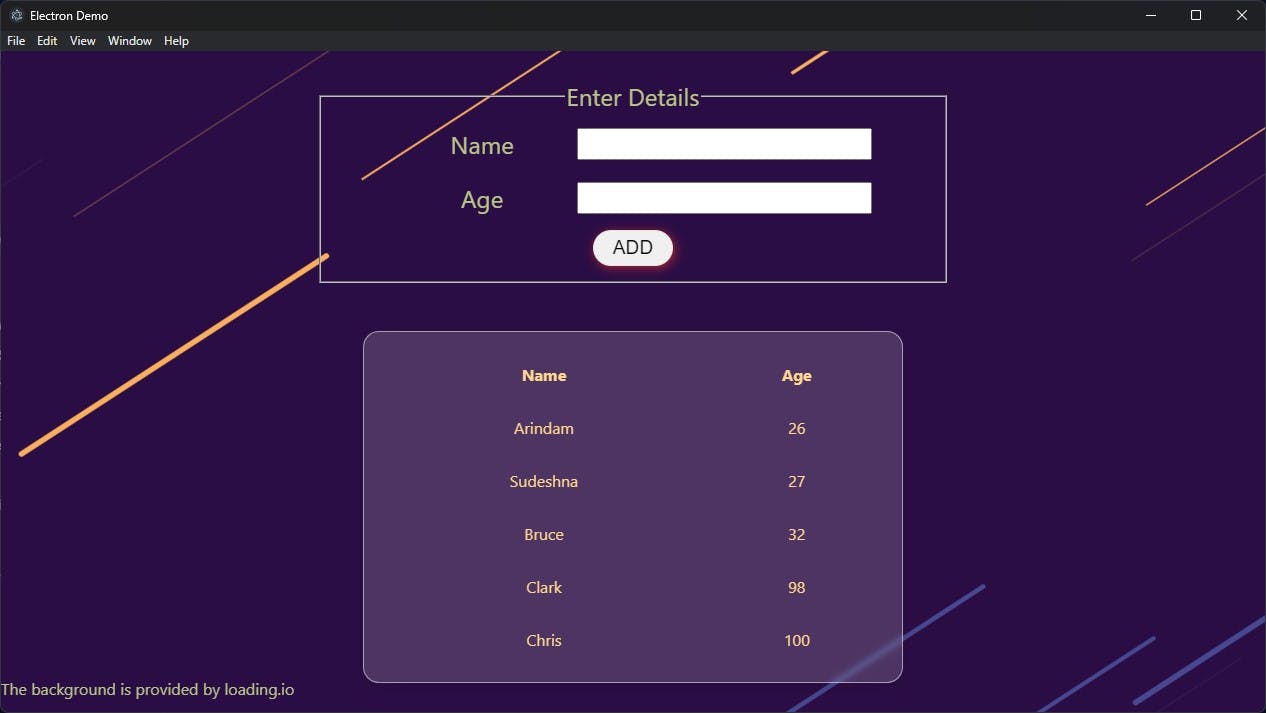
Are you trying to build your own Electron JS application with React? Do you also want to store and manage data efficiently with SQLite? In this step-by-step guide, I will show you how to integrate Better-SQLite with your Electron JS app, using Create-React-App. This is what we will build.

1️⃣ Introduction
Before we jump into the technical stuff, let's quickly cover what we aim to achieve. Our goal is to integrate Better-SQLite3 (The fastest and simplest library for SQLite3 in Node.js.) into an Electron JS application built with Create-React-App. This will allow us to persist data in our user's system only.

2️⃣ Setup and Initialization
I hope you know how to set up Electron project with create-react-app. If you don't, you can follow this article to get started. (Sorry for being lazy 😛)
Now we need to initialize the database. To do this, we will create a new file first named demo_table.db. This will be the file that stores the database data. Then using DBeaver, we will create a table in this database called person.

Note: Tables and DB files can be created using better-sqlite3 as well. I did it this way to make the setup easier.
Next, you need to install better-sqlite3.
We also need to install electron-rebuild. This is required to run better-sqlite3 if you're facing any issues where the node versions don't match. This is taken from their docs:
This executable rebuilds native Node.js modules against the version of Node.js that your Electron project is using. This allows you to use native Node.js modules in Electron apps without your system version of Node.js matching exactly (which is often not the case, and sometimes not even possible).
npm install better-sqlite3
npm install --save-dev electron-rebuild
After the installation is completed, add this to your package.json
{
    ...
    "scripts": {
        ...
        "rebuild": "electron-rebuild -f -w better-sqlite3",
    }
}
And then do npm run rebuild to rebuild better-sqlite3 for your system.
3️⃣ Setting up DBManager.js
In public folder, we will create a folder called Database which will contain all the files related to the database. Let's create a DBManager.js file :
const Database = require("better-sqlite3")
const path = require("path")

const dbPath =
    process.env.NODE_ENV === "development"
        ? "./demo_table.db"
        : path.join(process.resourcesPath, "./demo_table.db")

const db = new Database(dbPath)
db.pragma("journal_mode = WAL")

exports.db = db
For production, the demo_table.db file will be kept in a folder called resources. We can get the path of this folder using process.resourcesPath.
The db file is an extra resource that we need to mention in our package.json, so that when the build happens, demo_table.db is moved to resources folder. This configuration is given for build done using electron-builder.
{
    "name": "electron-sqlite",
    ...
    "scripts": {
        ...
        "package-windows": "rm -rf build && rm -rf dist && npm run build
       && electron-builder -w -c.extraMetadata.main=build/electron.js",
        "electron-rebuild": "electron-rebuild -f -w better-sqlite3",
    },
    "build": {
        "appId": "sqlite.electron-test.app",
        "productName": "SQLite Electron",
        "files": [
            "build/**/*",
            "node_modules/**/*",
            "public/**/*"
        ],
        "directories": {
            "buildResources": "public"
        },
        "extraResources": [
            "./demo_table.db"
        ]
    }
}
4️⃣ Create a Manager file to manage a Table instance
Let's create a file called PersonManager.js to invoke methods related to Person table.
We will create a method to read all the data from the Person table.
For inserting data, we will use a transaction. So that if an exception is thrown, the transaction will be rolled back (and the exception will propagate as usual).
const dbmgr = require("./dbManager")
const db = dbmgr.db

const readAllPerson = () => {
    try {
        const query = `SELECT * FROM person`
        const readQuery = db.prepare(query)
        const rowList = readQuery.all()
        return rowList
    } catch (err) {
        console.error(err)
        throw err
    }
}

const insertPerson = (name, age) => {
    try {
        const insertQuery = db.prepare(
            `INSERT INTO person (name, age) VALUES ('${name}' , ${age})`
        )

        const transaction = db.transaction(() => {
            const info = insertQuery.run()
            console.log(
                `Inserted ${info.changes} rows with last ID
                 ${info.lastInsertRowid} into person`
            )
        })
        transaction()
    } catch (err) {
        console.error(err)
        throw err
    }
}

module.exports = {
    readAllPerson,
    insertPerson,
}
5️⃣ Creating a Bridge with Preload.js
In Electron, security is essential, so we use the contextBridge in Preload.js to expose our PersonManager functions to the renderer process securely. This prevents any unauthorized access and keeps our data safe.
const { contextBridge } = require("electron")
const personDB = require("./Database/PersonManager")

contextBridge.exposeInMainWorld("sqlite", {
  personDB,
})
6️⃣ Fetching/Inserting Data in React
Time to get React involved! In your React component, you can create a fetchData() function to fetch all the Person data from the database. You also don't have to import anything as well!
const fetchData = useCallback(() => {
    const data = window.sqlite.personDB?.readAllPerson()
    setData(data)
}, [])
To insert data, we can use the insertPerson( ) function defined above.
const name = e.target.name?.value
const age = e.target.age?.value
if (!name || !age) return

window.sqlite.personDB?.insertPerson(name, parseInt(age))
fetchData() // Fetch updated data, and set it to the UI
Possible Errors
If you're getting any errors in your console due to SQLite, check all the other errors that are being shown. Many a time, the other errors contain the exact information which you need to resolve the issue (talking from personal experience 😥).
Check whether Electron can read the DB file properly and whether the path to the DB file is proper or not.
Temporary files like demo_table.db-shm, demo_table.db-wal gets created when running the application. Sometimes, the creation of new files makes React refresh, and this turns into an infinite refresh of the page. To stop this, you have to disable hot-reload, using an ignore path. Or you can keep the db file outside of the root directory like I did for a private project.
Build and Final Touch
Now, you can add new persons from the UI, then refresh or even close the application. Next time when you open it, everything should be present there.

To build it for Windows, you can run npm run package-windows. dist folder will contain the executable file through which you can install it on any machine. It also generates a portable exe file, present inside win-unpacked which can be run without installation.
For Linux and Mac, you can add this to your scripts in package.json.
"package-mac": "rm -rf build && rm -rf dist && npm run build &&
   electron-builder build  -m -c.extraMetadata.main=build/electron.js ",
"package-linux": "rm -rf build && rm -rf dist && npm run build &&
   electron-builder -l -c.extraMetadata.main=build/electron.js"
P.S. I haven't tested for Linux and Mac, since I don't have one. If any changes are required, do let me know.
You can find the Github repo here.
Congratulations, you've made it to the end of this guide! Integrating Better-SQLite with your Electron JS app using Create-React-App might have seemed daunting at first, but you did it like a champ! You can now confidently store and manage data using SQLite in your Electron JS app.
References:
